


For radio enthusiasts and CB operators, the Slim Jim antenna is a popular choice thanks to its simplicity, efficiency, and solid performance. It’s essentially a variant of the J-pole antenna, optimized for low-angle radiation and a strong omnidirectional pattern. If you’re operating in the UHF CB band (around 476–477 MHz in Australia), building a Slim Jim can give you a reliable, compact antenna that’s inexpensive and easy to make.
The Slim Jim antenna is one that is made from 450 Ohm ladder line which is quite light making it an ideal antenna to put on the end of a 9+ meter squid pole.
Why a Slim Jim?
The Slim Jim is prized for two reasons: its gain and its feed-point impedance. Unlike a simple quarter-wave whip, a Slim Jim has a radiation pattern tilted slightly lower toward the horizon, improving ground-wave coverage. This makes it ideal for CB radio, where line-of-sight range is crucial. It also presents a natural 50-ohm feed point when built to spec, meaning you can connect it directly to your coaxial feed line without complex matching networks.
Materials You’ll Need
- Ladder line: Up to 1m of 350ohm or 400ohm ladder line.
- Coaxial feedline: RG-58, RG-213, or low-loss coax suited for UHF.
- Basic tools: Hacksaw, soldering iron or clamps, drill, and measuring tape.
- Pole: Squid pole, the longer the better.
- Mounting hardware: Hardware to mount the squid pole somewere secure.
Design Specifications
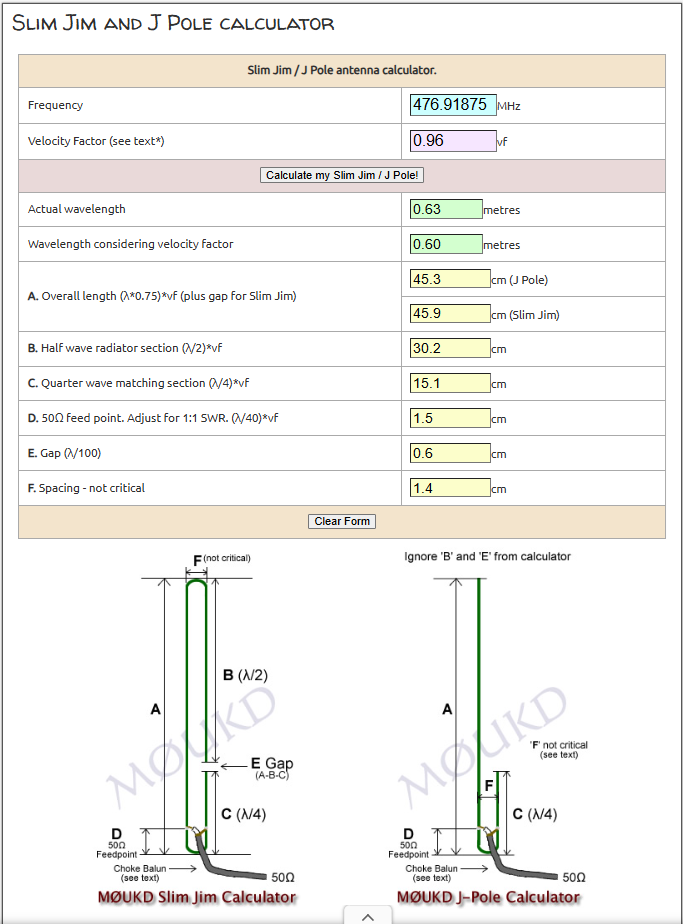
Using the online calculator from M0UKD, we can generate precise dimensions for a Slim Jim tuned to 476.91875 MHz, right in the middle of the UHF CB band. With a velocity factor of 0.96 (typical for copper or aluminum conductors), the key measurements are:
- Overall length (A): 45.9 cm
- Half-wave radiator (B): 30.2 cm
- Quarter-wave matching section (C): 15.1 cm
- Feed-point (D): About 1.5 cm up from the base
- Gap (E): 0.6 cm
- Spacing between elements (F): ~1.4 cm (not critical)
These dimensions may need slight adjustment during tuning, but they’ll get you very close to resonance.
Construction Steps
- Cut and Prepare the Elements – Cut two lengths of tubing or wire for the radiator and the matching stub. Mount them side by side with an insulating spacer at the top and bottom, ensuring a consistent gap of around 1.4 cm.
- Mark the Sections – From the bottom, measure up 15.1 cm for the quarter-wave stub (C). The remaining section will form the half-wave radiator (B).
- Install the Feed Point – Attach the coaxial cable’s center conductor to one element and the braid to the other, about 1.5 cm up from the base. Use clamps, bolts, or solder depending on materials.
- Mount and Support – Secure the entire assembly to a length of non-conductive pipe for stability. The Slim Jim should be mounted vertically for correct polarization.
- Tune and Test – Connect to your CB radio via an SWR meter. A properly built Slim Jim should show a low SWR (ideally <1.5:1). If not, adjust the feed-point slightly up or down until you find the sweet spot.
Performance and Use
When mounted in the clear—on a mast, rooftop, or portable pole—the Slim Jim can provide excellent range on UHF CB. Many operators report noticeably stronger signals compared to basic whip antennas. It’s lightweight, inexpensive, and can be built in an afternoon, making it a rewarding DIY project for both new and experienced CB operators.